Before / After – Joe Satriani
THE STORY
've photographed soulful blues guitarists like BB King and Buddy Guy, technical wizards like Eddie Van Halen and Joe Bonamassa, and fusion explorers like Jeff Beck and Pat Metheney, but I don't think I've ever seen the technical proficiency I saw from Joe Satriani. He's definitely a guitarist's guitarist, but for what he does, there's no one else who does it better.
For this show, like all shows at the Taft Theatre, there was no photo pit. I was allowed to photograph from the sides and back of the house. These distance challenges dictate that I change up the gear I bring. Typically, for a pit shoot, I bring my wide zoom (16-35mm) and my telephoto zoom (70-200mm). The most important change in my gear for a soundboard or front of house shoot, is my 150-600mm hyper telephoto lens. This comes with some compromises as the aperture is from f/5-6.3, so if there’s not a ton of light, I’ll be jacking up the ISO a bit higher. For my secondary lens, the 16-35mm is too wide of an angle to be useful, so I break out the first decent lens I ever bought, my trusty 24-70mm that’s nearly 20 years old. Armed with my long distance kit, I’m ready for anything!
THE EDIT
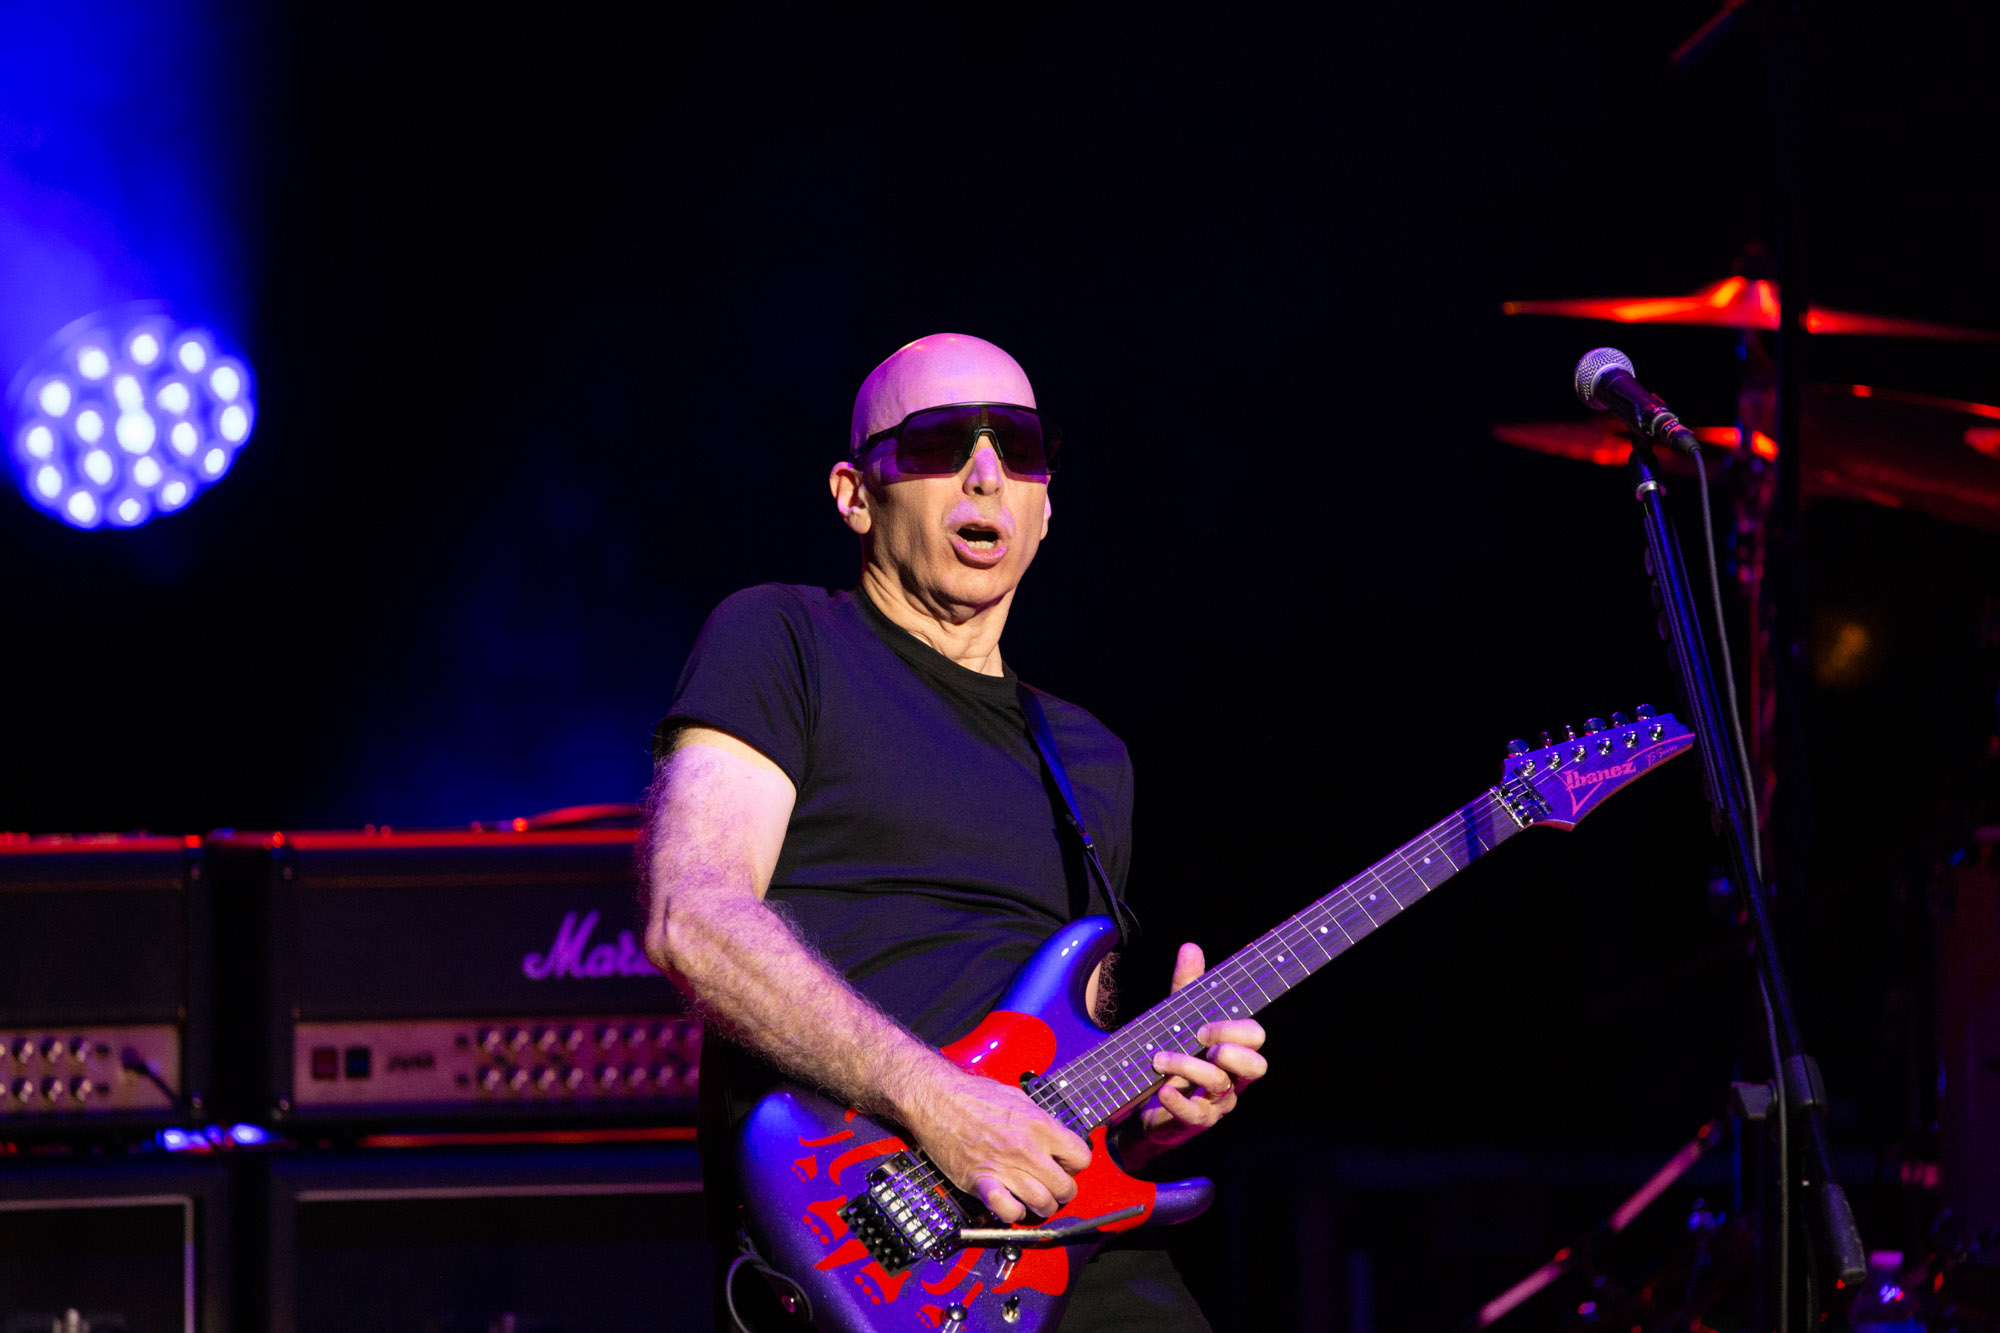
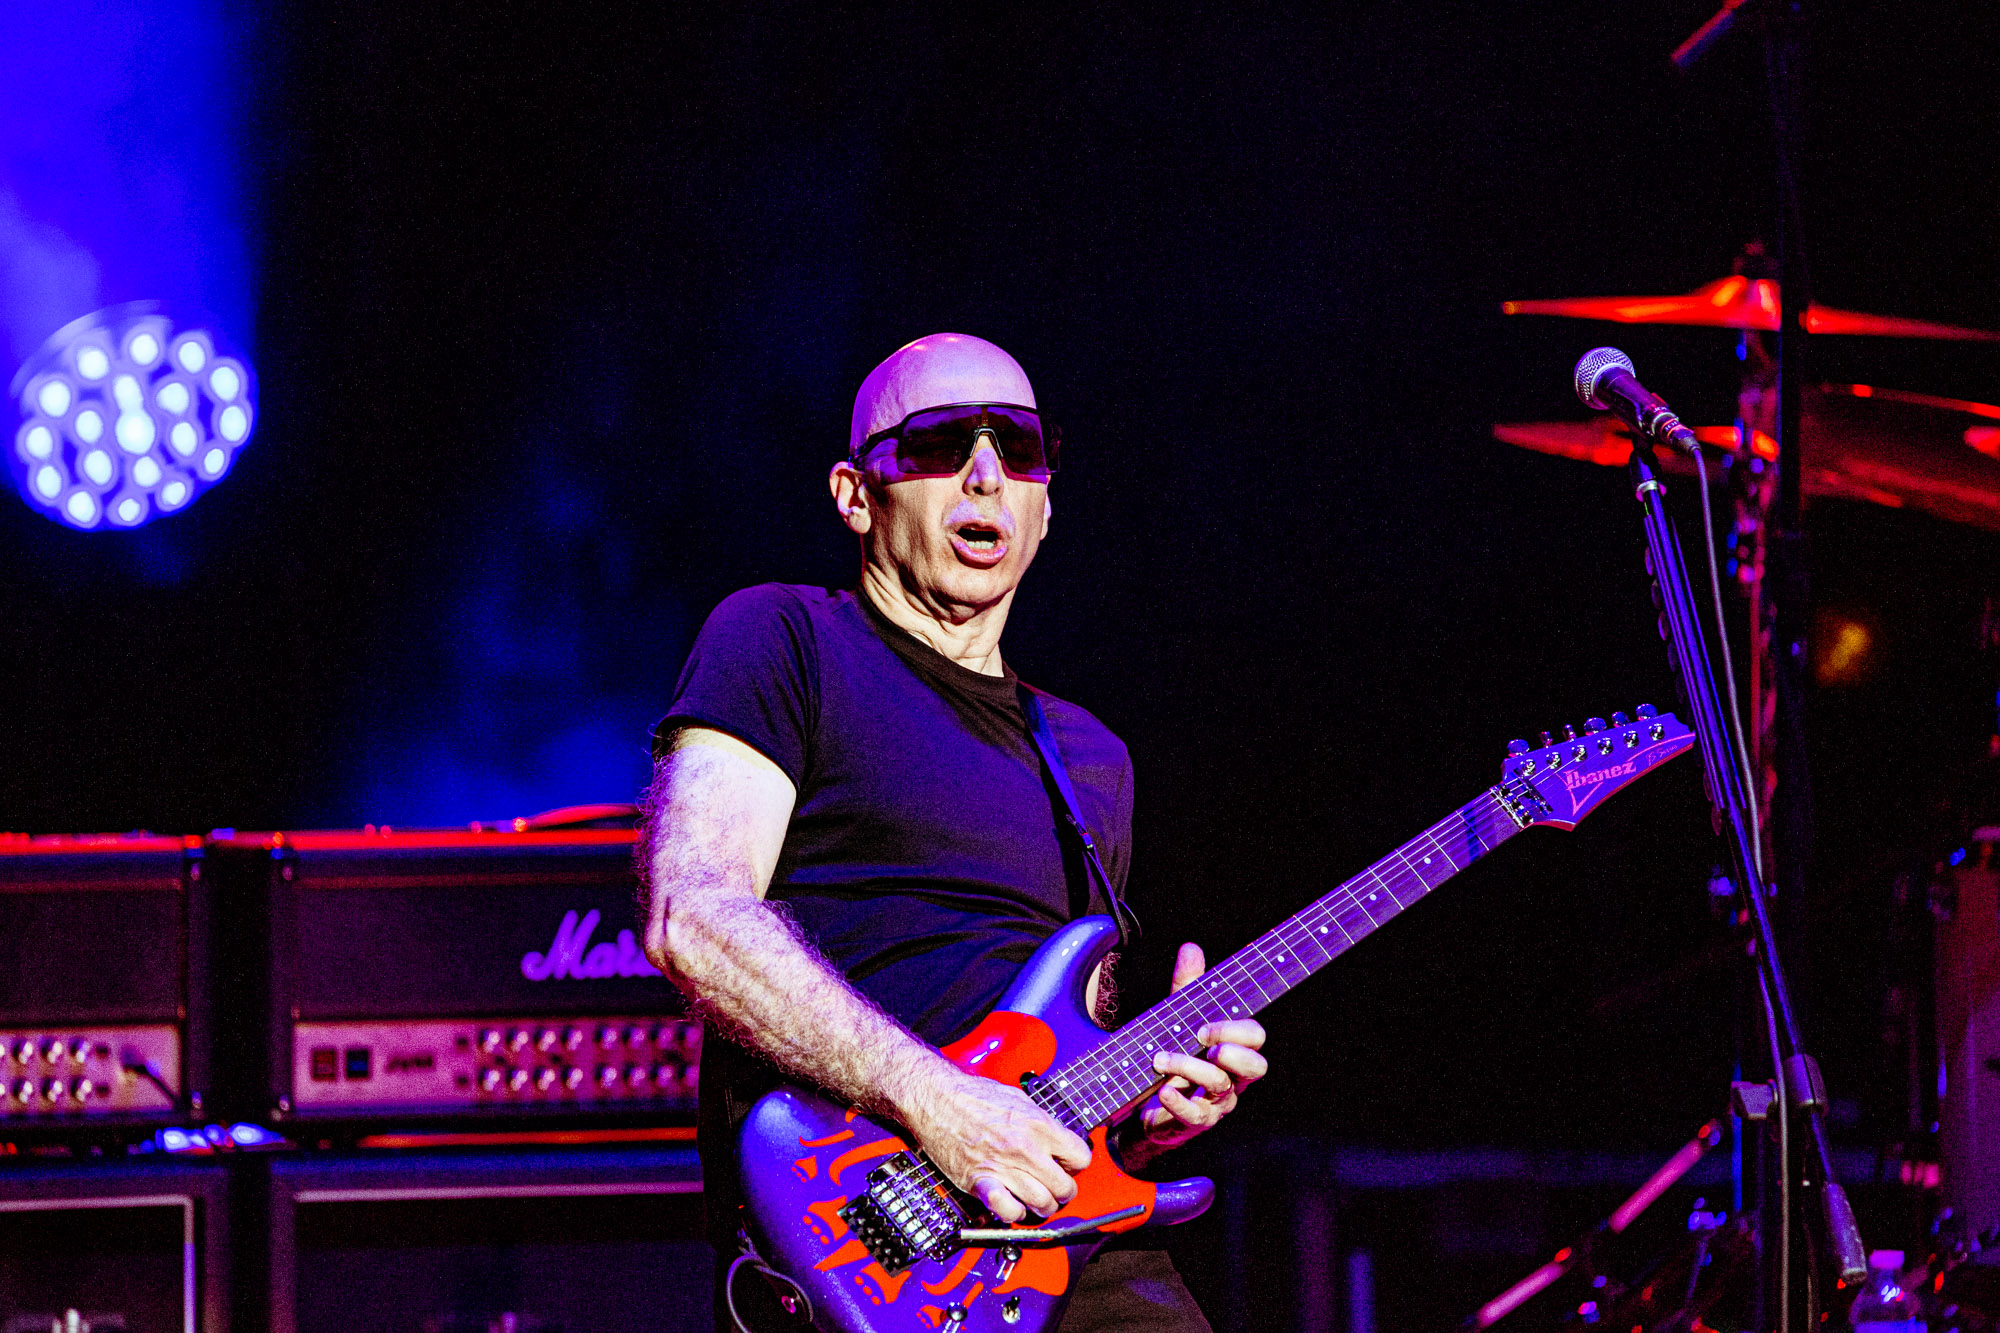
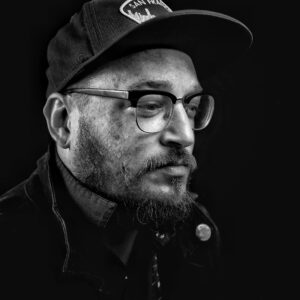
As you can see from the before and after, this photo didn’t need much, but the subtle tweaks are what take a decent photo to an interesting photo. The first thing I did was apply my custom high contrast, neutral color preset and that got my 90% of the way to the finished product. Rather than walk you through the minor tweaks I made after the preset, I thought this would be a good opportunity to go through a full edit, without the preset.
When I began doing photography I was (and still am) enamored with the crazy high contrast and details of Anton Corbin’s work. If you’re not familiar, I highly recommend you check him out. The look of his work has greatly inspired how I approach my editing. Obviously I start the basics, proper exposure and white balancing. For a photo like this one where the light itself is pretty neutral, it was only a minor tweak. To create the high contrast look, I pumped up the contrast a bit and and lowered the black levels significantly. I then lowered the shadows a bit as well to set Joe off from the background.
With the basic tone settings all set, I moved on to the presence settings. I’m a big fan of the detail you’re able to bring out with these sliders but be careful, it’s easy to overdo it. First I boost the texture a bit. Often times, light can flatten and wash out details and textures. This slider can bring them back a bit. Second, I boost the clarity, which brings out more fine details and brightens up the blue in the background. I find that the clarity slider does really cool things when there’s fog/smoke on stage. Lastly, the most powerful of the presence settings, dehaze. When Lightroom added the dehaze setting in 2015, it was a game changer for concert photos. It’s amazing what it can do when there’s an overwhelming amount of smoke or lens flare. But, this is the setting that’s the easiest to overdo. A little goes a long way. For this photo since there was minimal stage fog, I just boosted it a tiny bit to darken up the darkest parts of the image.
The last thing I do, which I’ve mentioned in previous Before & Afters, is a tiny bit of split toning. I like to tint the shadows and highlights with complimentary colors. This is a subtle change that most probably wouldn’t notice unless you shows the before and after changing the setting, but I think it’s a thing that subconsciously grabs the eye.
I’d would be remiss to not mention the bit of noise (that’s the word for the graininess you see in the image). In a situation where I’m having to either shoot in low light or with a higher aperture, I’m faced with choices on how approach the photo to get proper exposure. I can lower my shutter speed to let light hit the sensor for longer, but this can lead to motion blur either from the band moving or from me not holding the camera perfectly steady. My other option is to raise my ISO, which cause noise, or graininess in the photo. Given the choice between blur or noise, I’ll always choose to go for the noise every time.
I know many probably think I’m crazy for posting basically exactly how to achieve the look of my photos. But, all of the skills I have are things I’ve learned from other photographers who were generous enough to share their knowledge with me. If my work and this look behind the curtain inspires one person to get into photography or specifically into concert photography, I’d be thrilled. Also, there’s so much more that goes into how I make my photos, from composition to anticipating what a band does on stage to being able to think on my feet when things change. I often say that I like editing as much as shooting. Photographing a show is like cooking a meal. You get all the ingredients and put them together in the right way and when you get home and edit, it’s the equivalent of seeing and eating the final dish. It’s the fruition of all of your efforts and seeing the final product is still thrilling to me every time.
THE DETAILS
LOCATION – Cincinnati, OH
VENUE – Taft Theatre
DATE – October 22, 2022
PHOTOGRAPHER – Brian Bruemmer, Rubatophoto.com
CAMERA – Canon 6D
LENS – Sigma 150-600mm f/5-6.3
APERTURE – f/6.3
SHUTTERSPEED – 1/320
FOCAL LENGTH – 600mm
ISO – 3200
SOFTWARE – Adobe Lightroom Classic
Musician, concert photographer, writer, podcast host and founder of The Hot Mic Music Magazine.
-
Brian Bruemmerhttps://thehotmic.co/author/brian-bruemmer/
-
Brian Bruemmerhttps://thehotmic.co/author/brian-bruemmer/
-
Brian Bruemmerhttps://thehotmic.co/author/brian-bruemmer/
-
Brian Bruemmerhttps://thehotmic.co/author/brian-bruemmer/