Before / After – The Mars Volta
THE STORY
t's been nearly a whole year since the last Before & After. While I enjoy doing them and think it's exciting to demystify what I do as a concert photographer, it's a lot of work! When I shoot a show, I like to edit the same night. My workflow is pretty efficient, but sometimes, things get more involved. I immediately start importing from my memory cards while I figure out something to snack on and watch during my editing. Once the photos have been imported to Lightroom, I do a first pass at culling, marking images as picked or rejected. Once I've done that first pass, I then go through and apply my base preset for concert photos that I developed a few years back and make any necessary tweaks on an image-by-image basis.
Once the photos have been edited, I then look at the gallery as a whole. Do I have too many similar images? If so, I pick the best one and remove the others. Do I have photos of each band member? If not, I will go through the rejected photos to see if there are any that I missed. Then I do a final culling where I look at the collection as a whole and decide if any photos don’t make the grade or don’t seem to fit the collection. That can take anywhere from 30 minutes for a straightforward show with simple lighting, limited band members and smaller lineups to 3 or 4 hours for more complicated lighting that requires intricate color correction and running through an AI denoise process.
Then comes the more clerical part of concert photography. The photos are tagged with the appropriate metadata for my copyrights and the band name before being exported. Once exported, the photos are posted on The Hot Mic. Next is to select a few favorite images and either create a video slideshow or upload the stills to Instagram, where I have to come up with a caption, tag the band and band members (if I can find their individual accounts), tag my photography page as a collaborator and add selected hashtags. Once the post is made, I share it to our story, tagging the band, venue and my photo page and adding the link to the full gallery on our site. That makes it as simple as possible for the artist, venue and my photo page to share the story with only one click. This process adds another hour or so.
I’ll try to make these posts more frequent, but if not, know that it’s because I’m hard at work photographing, podcasting, writing retro reviews, and organizing more exciting content for The Hot Mic!
THE EDIT
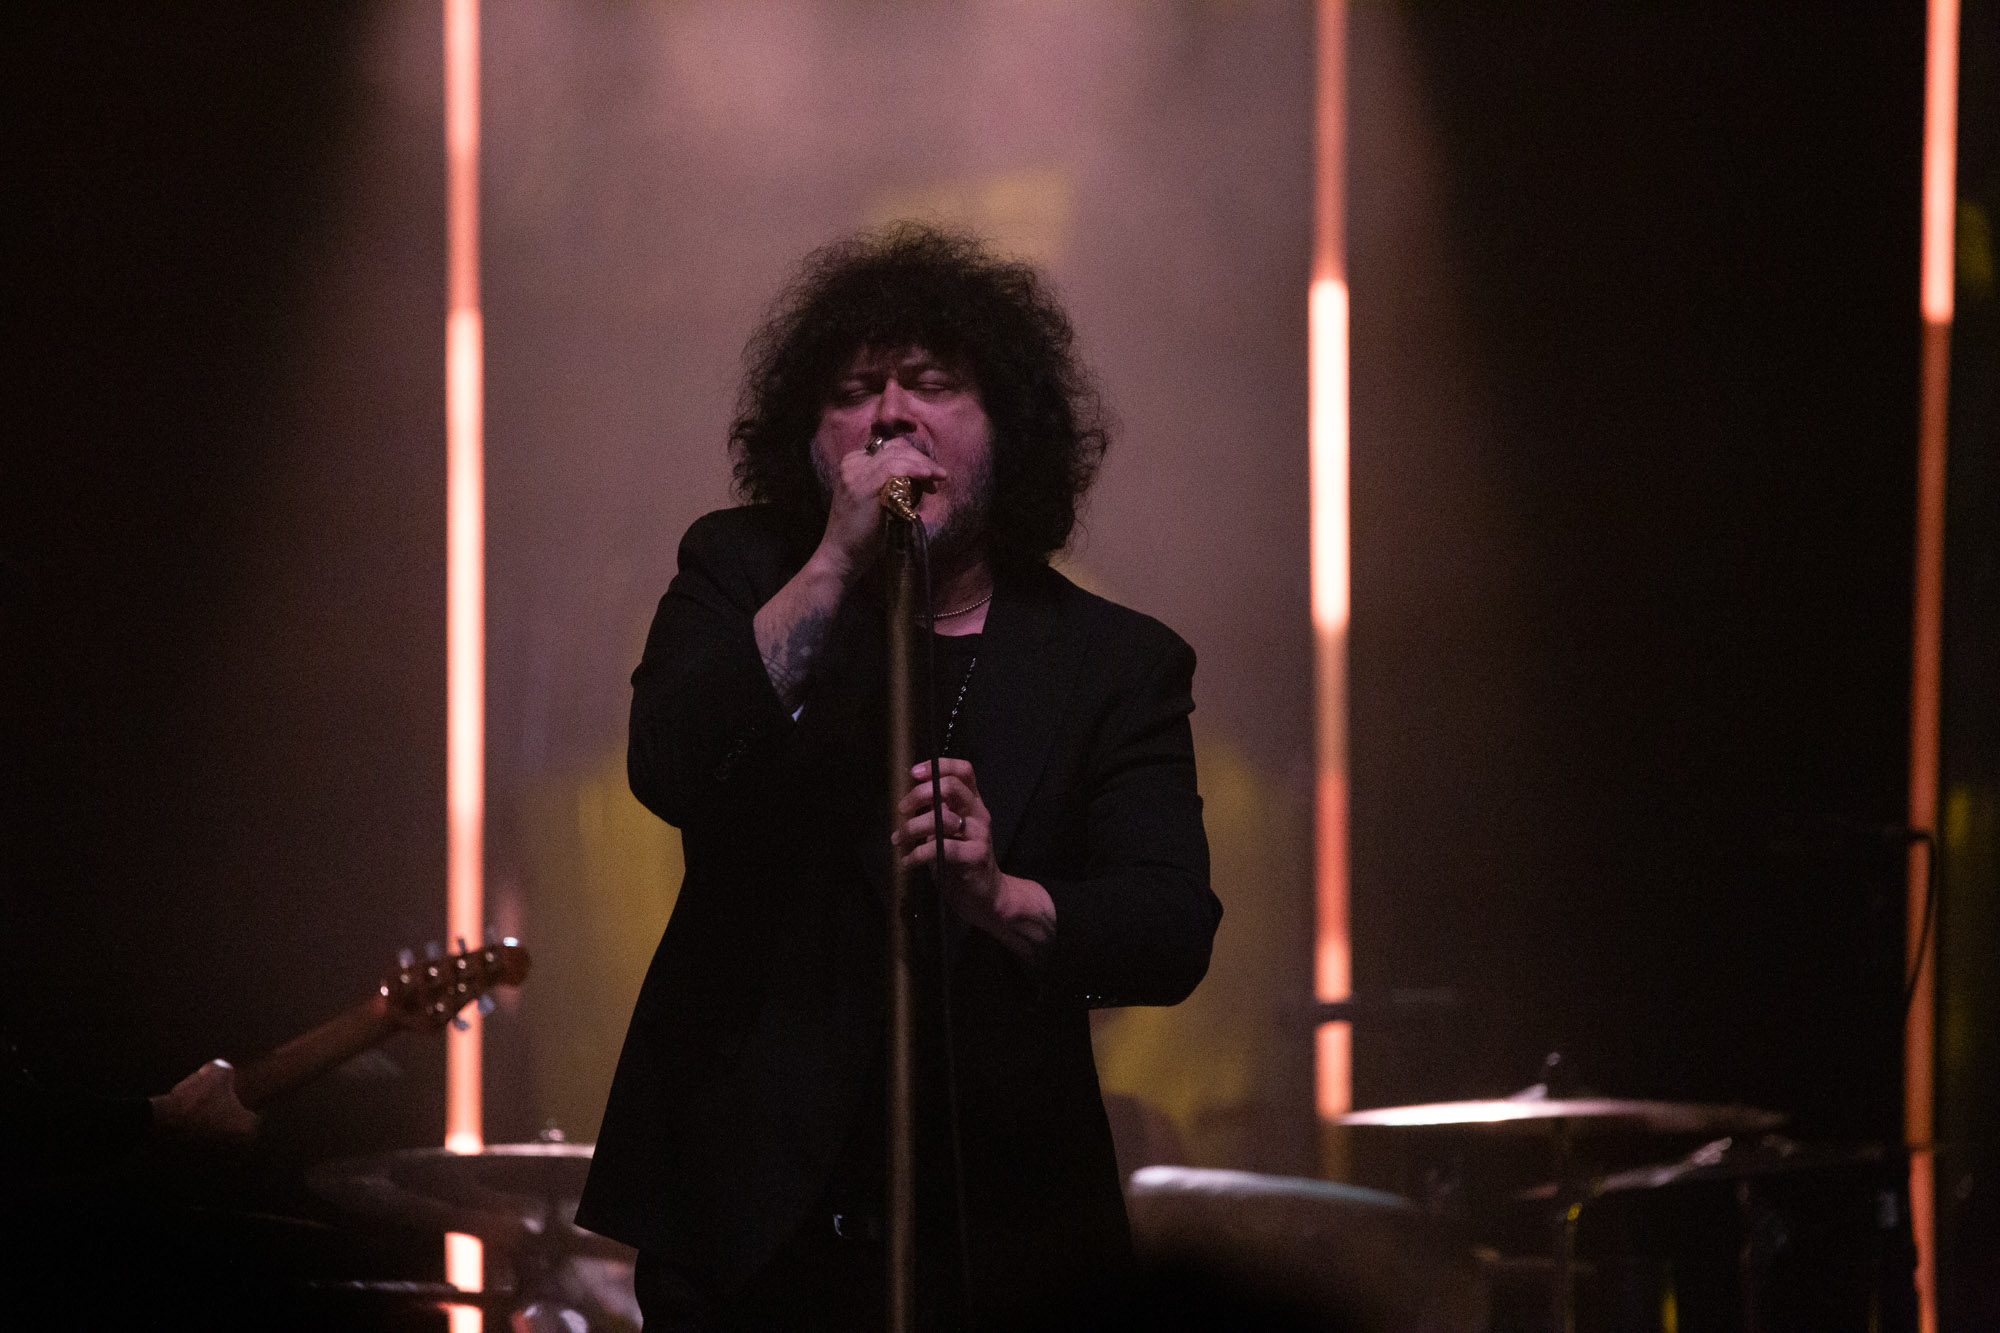
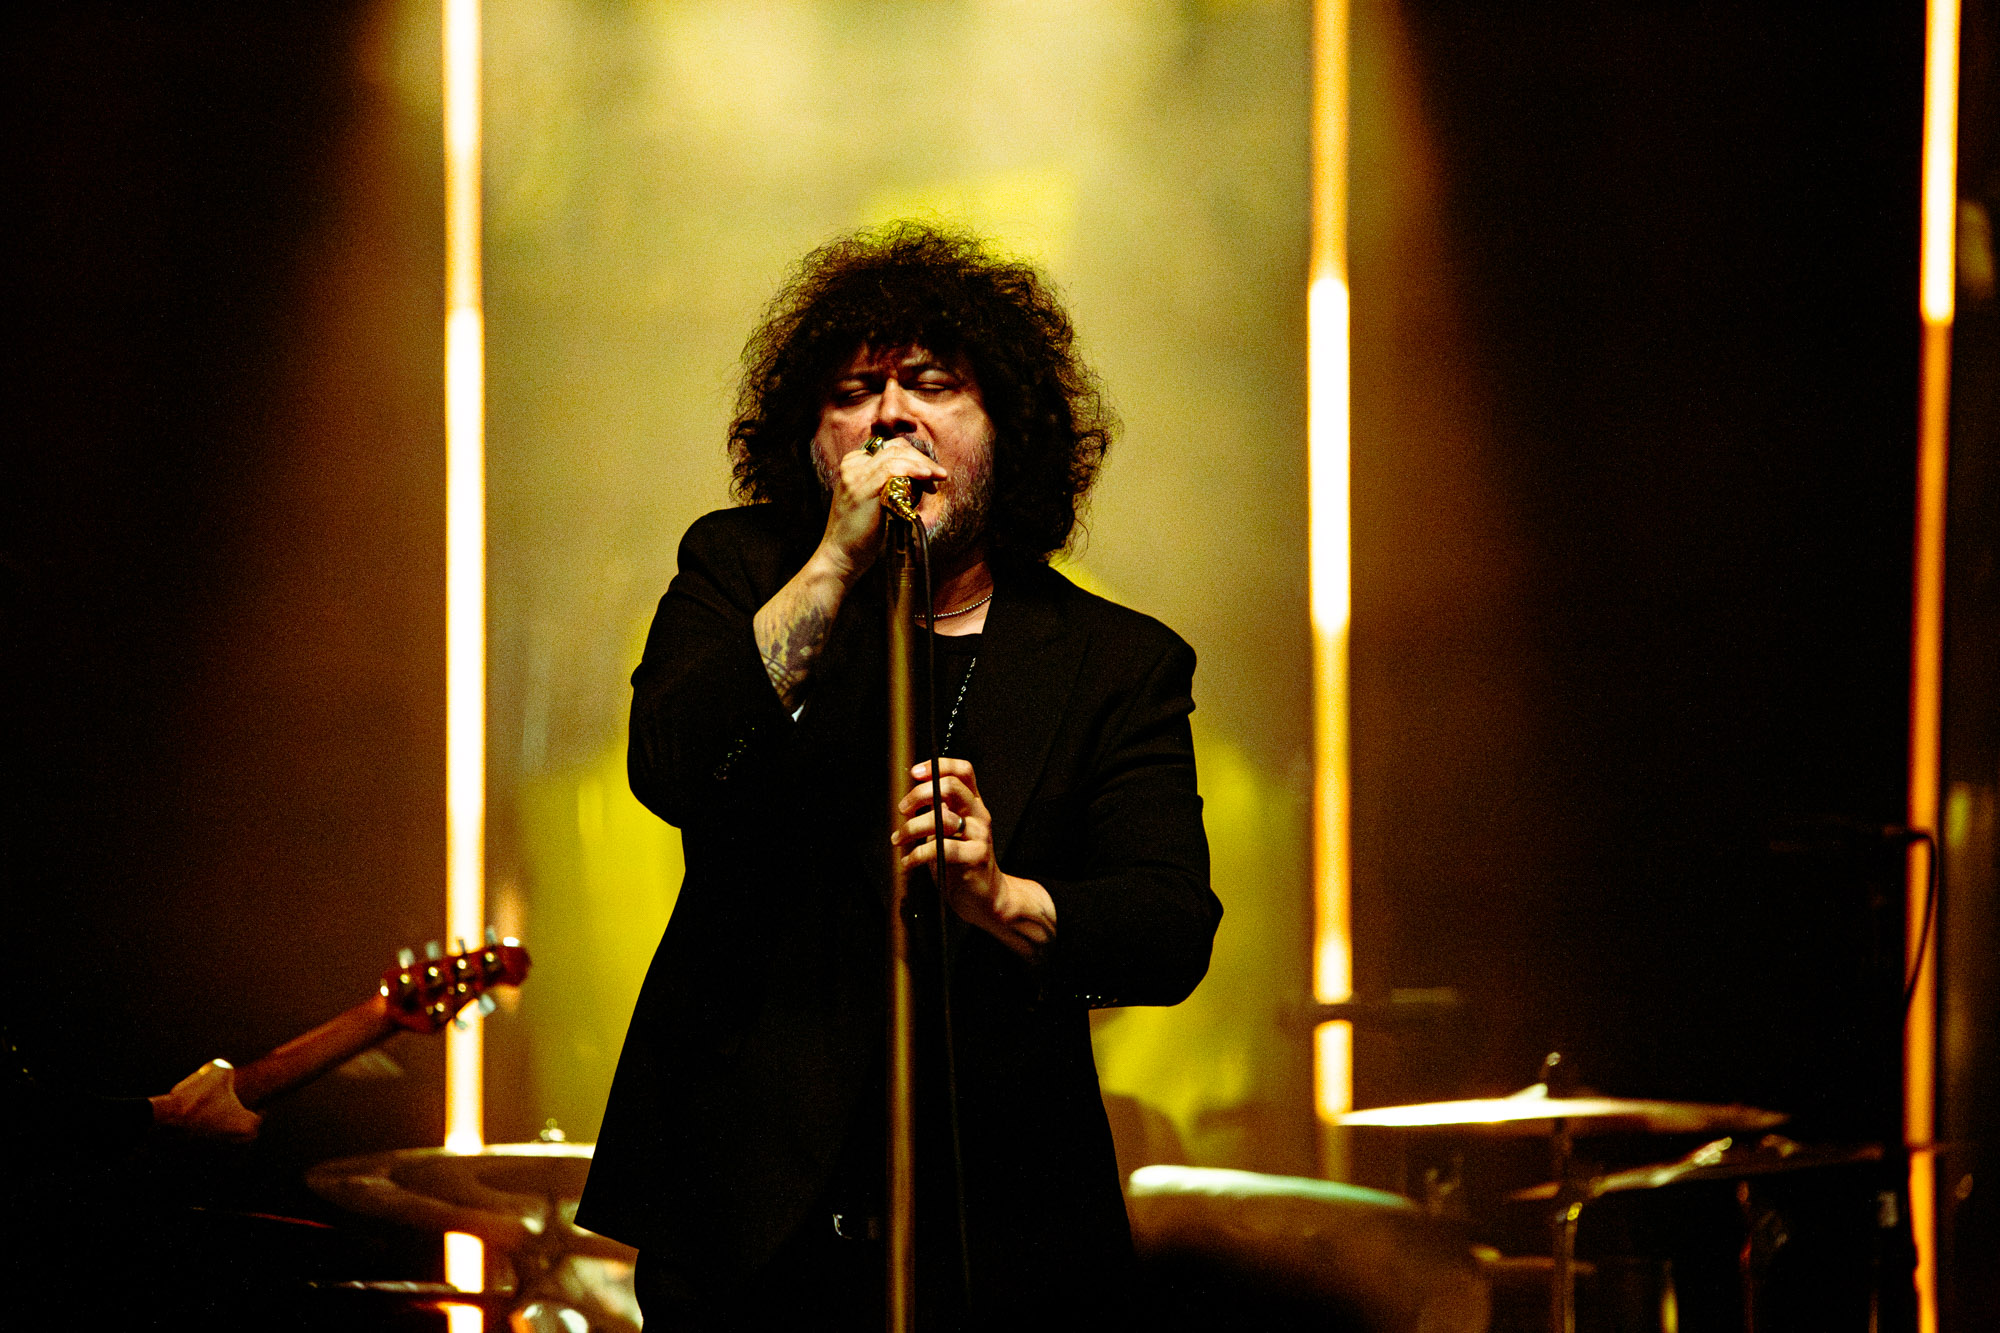
I know it’s super nerdy, but I’m always interested in looking at the EXIF data of other photographers’ photos to see what settings they used to achieve their results. One thing I’ve noticed a lot is that many seem a bit scared of the higher ISO and instead will post photos that are either too dark or blurry from having a slow shutter speed. I can at least attempt noise reduction after the fact, but there’s nothing I can do about a far too-dark or blurry photo.
This photo is not one of the most dramatic transformations, but it did take some careful work to make the best of some very challenging light. I typically keep my ISO below 6400 as that’s the highest I can get usable images without using an AI denoise like the one built into Adobe Lightroom Classic or Topaz. It’s a delicate balance between ISO, aperture, and shutter speed, but when my aperture is as low as I can go and my shutter speed is as slow as I can reliably get images without motion blur, then the only solution is to start ramping up the ISO and worry about the noise later.
For this show, I was pushed to the limits of my comfort for ISO (12,800), even with AI denoise. But I was still able to get some great images. Out of camera, this photo was dark, noisy, and far too orange/yellow. First, I ran the AI denoise and applied my base preset, which is a combination of settings that include lowering the black levels, bringing up the highlights a tiny bit, and a combination of texture, clarity, and dehaze to bring out detail and combat any stage fog or glare.
After the preset, I move to the color correction and adjust the white balance to a cooler color temperature and the tint a tiny bit more toward green. Next, I go to the color grading section, where you can dial in specific colors for the shadows, midtones, and highlights. I have a personal preference, and what makes my photos look and feel like me (whatever that means, haha) is to have the shadows ever so slightly tinted reddish orange. This warms up the images and brings out some interest in what would otherwise be a bit drab in the darker parts of a photo.
I do the exposure last because all of the other settings affect the image’s overall brightness, and I want to have all of my color and detail settings finalized before I set my exposure. At that point, I do one final pass on the image and tweak individual settings as needed.
So, while this may not be the most dramatic transformation, it’s an example of how far editing technology has come and how it can be used to make the best of a challenging shoot.
THE DETAILS
LOCATION – Cincinnati, OH
VENUE – Brady Music Center
DATE – Septemver 30, 2023
PHOTOGRAPHER – Brian Bruemmer, Rubatophoto.com
CAMERA – Canon 6D
LENS – Sigma 150-600mm f/5-6.3
APERTURE – f/6.3
SHUTTERSPEED – 1/250
FOCAL LENGTH – 451mm
ISO – 12,800
SOFTWARE – Adobe Lightroom Classic
Musician, concert photographer, writer, podcast host and founder of The Hot Mic Music Magazine.
-
Brian Bruemmerhttps://thehotmic.co/author/brian-bruemmer/
-
Brian Bruemmerhttps://thehotmic.co/author/brian-bruemmer/
-
Brian Bruemmerhttps://thehotmic.co/author/brian-bruemmer/
-
Brian Bruemmerhttps://thehotmic.co/author/brian-bruemmer/